
Google Analytics is an indispensable tool for your site that tracks your website traffic for valuable insights. With the data you collect with Google Analytics, you can see:
- How many people are visiting your site, and for how long
- Where they are going
- Where they came from
- What your most popular pages are
- What pages you lose people at
- How many people are viewing your site on mobile phones
- And much more!
Even if you aren’t ready to dig in to the reports, getting the tracking started means when you are ready you’ll have lots of data already in there!
And signing up for a Google Analytics account is simple. I’ll walk you through it step by step in this Google Analytics account setup tutorial. So let’s get started!
Step 1: Go to http://analytics.google.com and Create Your Account
If you have a Google or Gmail account already, just click sign in, otherwise you’ll need to create one.
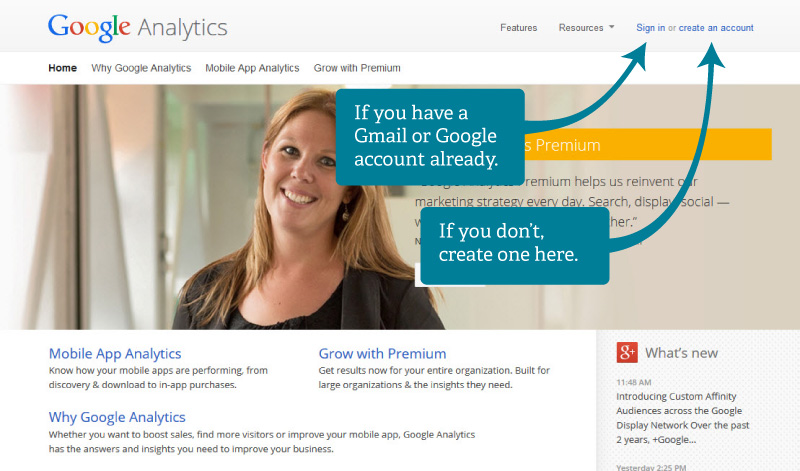
If you don’t have a Gmail or Google account already, you’ll need to fill out the Google account creation form and create one:

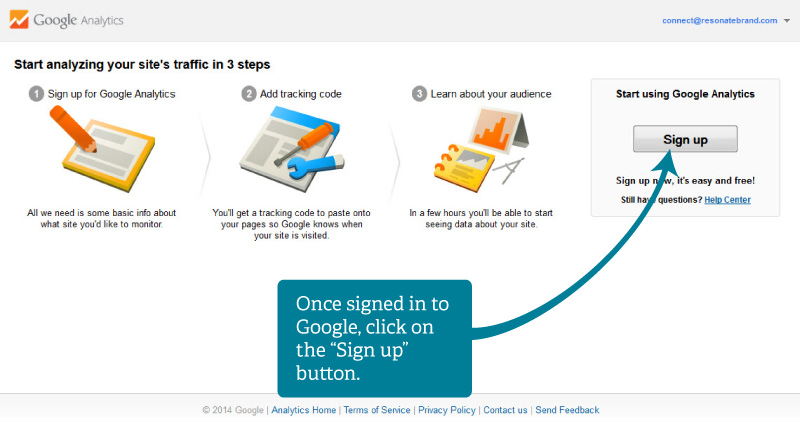
Step 2: Set Up Your Google Analytics Account
Once you are signed into Google Analytics with your Google account for the first time, you’ll see this intro screen. Now that you are signed into Google, you need to set up your Google Analytics account itself. You will be able to enter the basic info for your website tracking on the next page. First, click on “Sign up”!
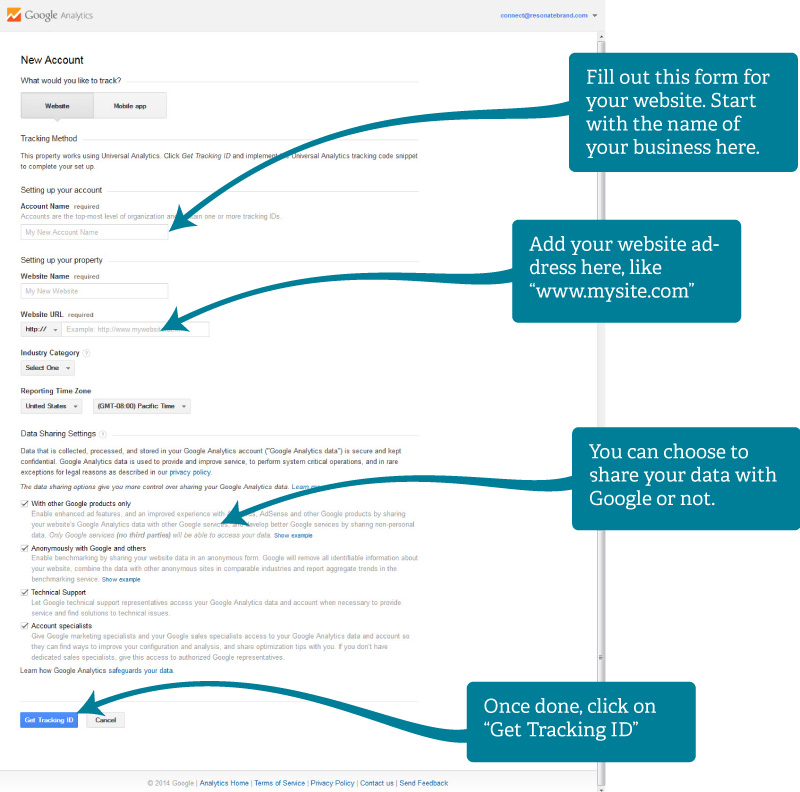
Once you do, you’ll come to this screen. This gets the basic information needed to set up tracking for your website in Google Analytics. Fill out all the form fields, starting with the name of your business. You can also uncheck the boxes further down the form that give permission to share your tracking data with Google.
Step 3: You’re Account is Ready
Voila! You’ve now created your first Google Analytics tracking property. This is where all the traffic information for your website will be recorded. You will then be able to start seeing the data as the data collects from website visitors. But first, this is where Google will send you next, seen below. You might need the Tracking ID in order to add the tracking to your site.
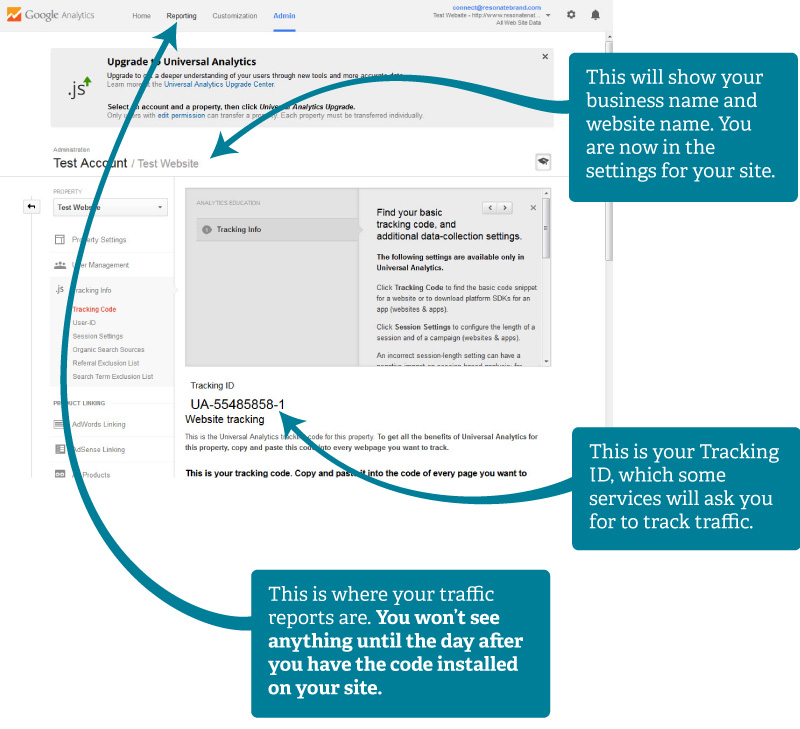
As you can see, there is a menu on top with a link called “Reporting”. That is where you’ll go to actually view your traffic data. But it won’t show anything until it has logged at least a day’s worth of data. That is, with the exception of the “Real-time” section of the Reporting area. Once in “Reporting”, you’ll see it on the left hand side menu.
Now the “Real-time” won’t even show anything yet, because you haven’t added tracking to your site yet. You’ve only set up the account. That’s the next step…
Step 4: Add Tracking to Your Site
Every website service is different when it comes to adding tracking. Some will let you log in with your Google account to connect your Google Analytics. Some will need for you to enter the Tracking ID in the image above.
If you are using WordPress, there is a plugin that makes it easy.
In your WordPress dashboard, go to “Plugins” and do the following:
- Click on Add New
- In the “Search Plugins..” box over to the right, type in “Google Analytics by MonsterInsights”
- When you find it in the plugins below, click on it’s “Install Now” button
- When done installing, the button will say “Activate” – Click it!
- You’ve now activated the plugin!
- In the left menu, you’ll now see “Insights” has been added to the menu. Click it!
- Click on the link that says “authenticate your Google Analytics profile here”
- Connect it to your Google account and copy the code Google gives you. Close the popup window and paste the code where it tells you to and click the save button.
- Select the Google Analytics profile you created previously from the dropdown.
- Then hit the Save button at the bottom of the page. You’re now done!
Once it is connected, you can go back to Google Analytics in a few days to start checking out your web traffic.
You’ll be able to see where people are going on your site, how many are visiting, where they are coming from, how long they are staying, even if they are using a mobile phone to view your site.
If you want to see if it’s working immediately, first go to your website. Then open a new tab or window and go to Google Analytics. Go to the Reporting area. Click on “Real Time” in the left side menu. Then click on “Overview” in the menu that drops down from it.
In the Real Time section, you should be able to see that there was at least one recent visitor – you!
Now you know it’s working.
But you shouldn’t need to worry if you set up the plugin already.
What’s Next?
Google Analytics provides a wealth of insight. You may want to explore once you’ve logged some data for a few days or weeks. If you don’t have much traffic yet, you may need weeks to get useful information.
Once you have some good traffic logged, start exploring the Overview pages of each section. Under Acquisition you’ll see where people came from. Organic Search means they came from a search engine. Direct means they didn’t come from a site, they must have typed in your address directly. You can click on the “All Referrals” menu item to see what sites have been sending you traffic.
Under the “Behavior” section you can see which are your most popular pages, how long they stayed on the page, etc. Under the “Site Content” menu item there are more links including “Landing Pages”, which is what page they first enter your site on. Or “Exit Pages” which are the last pages people visit before they are gone.
Under the “Behavior” section you also want to check out “Behavior Flow”. It creates a flow chart of how people are moving through your site from landing page to exit. It is quite impressive.
All this data can inform your strategies, the next content you’ll develop, and much more. And whenever we work together, it will be invaluable knowledge for developing your website or online marketing strategy.
What has been your experience with Google Analytics or traffic tracking? I’d love to hear your successes and your struggles with it. Would you like to hear more about using the data? Leave a comment below.
And I hope you’ll share this tutorial with others!
-Josh Parkinson